


Aurora HDR 2019 Review
Skylum software's Aurora HDR 2019 is one of the best HDR programs out there, especially for those wanting to make natural-looking images.
Software | Software Reviews | By Teryani Riggs | Last Updated: January 22, 2024
Shotkit may earn a commission on affiliate links. Learn more.
This Aurora HDR 2019 review is for landscape and cityscape photographers who desire to create wonderful High Dynamic Range photography. HDR photography allows you to expand an image’s tonal range far beyond that of a single exposure.
When done right, it gives you the entire palette that the human eye can see – something most single exposures simply can’t do.
To make HDR work well, you need very specific software. Traditionally, one would take 3-5 different exposures of the same scene and then put them into a program that would combine them together to get the best tonal range.
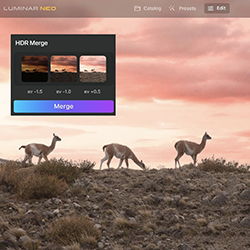
Luminar Neo HDR Merge provides all the capabilities of Aurora 2019 plus additional powerful editing features to take your images to the next level.
Use code shotkit10neo to save $10 at checkout.
Good software can also take a single Raw image and expand an image’s tonal range through tone mapping.
However, not all HDR programs are the same. While both Lightroom and Photoshop have the ability to combine the exposures for you, the image they come out with is generally lackluster and still needs a lot of post-processing to really make shine.
Most HDR photographers choose to go elsewhere for the actual exposure-combining and initial editing, not to mention a Lightroom alternative that doesn’t have a monthly subscription fee…. and for many, that software is called Aurora HDR.
Now Aurora HDR 2019 is out and the improvements keep rolling in. Let’s dive in to my Aurora HDR 2019 review to see if you should be using it to edit your HDR images here in 2024.
Aurora HDR Review Summary
With HDR photo editing as its primary focus, Aurora HDR is the most powerful software for editing high-dynamic-range images available today. Its ability to merge exposure brackets and tone map individual RAW files make it an essential tool for photographers wanting to take advantage of HDR.
What is Aurora HDR 2019?
Aurora HDR 2019 is Mac and Windows compatible software inspired by the workflow of Trey Ratcliff, a famous HDR photographer who’s really set the bar high for HDR photography.
Trey’s involvement is no doubt one of the main reasons why the interface and style is so different from other programs.
Like other HDR programs, Aurora can either combine bracketed photos taken at different exposures or create a tonal map of a single image shot in Raw.
The results are a higher tonal dynamic range than your camera could normally produce in a single exposure, with far more information in the shadows and highlights.
It can be used both as a stand-alone program and as a plugin for Lightroom, Photoshop, Elements and Apple Aperture.
(I personally think it’s best used as a plugin, but more on that later.)
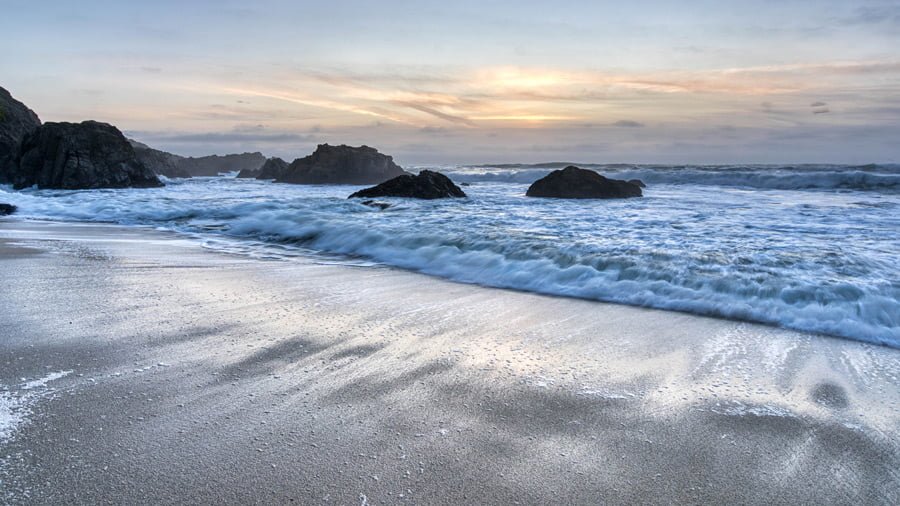
The superb ghost reduction in Aurora HDR 2019 made the edge of this wave look realistic | 1/6 f/8 ISO 100 | Sony a7III + Sony FE 16-35mm f/4 ZA
All HDR programs have their unique way of merging photos. Aurora HDR 2019 uses AI in their new Quantum HDR engine, and the results are excellent.
I’ve run a number of my old sets of bracketed exposures through it, and the opening image is often (though not always) far superior than what I was working with in the 2018 version or in Nik’s HDR Pro. (It was certainly better than anything I’ve ever done in Photomatrix Pro).
There’s far less noise in the final image and considerably better tonal blending. In addition, the ghost reduction is impressive and the color denoise and chromatic aberration reduction really works.
Not once have I ended up with halos or fringing. Literally not once!
On top of that, Aurora is also far more powerful and pleasant to use than any other HDR software I’ve ever worked with.
The UI is sleek and intuitive and the controls handle a bit like a race car – just the slightest adjustment creates substantial results.
Aurora HDR 2019 Review | The UI
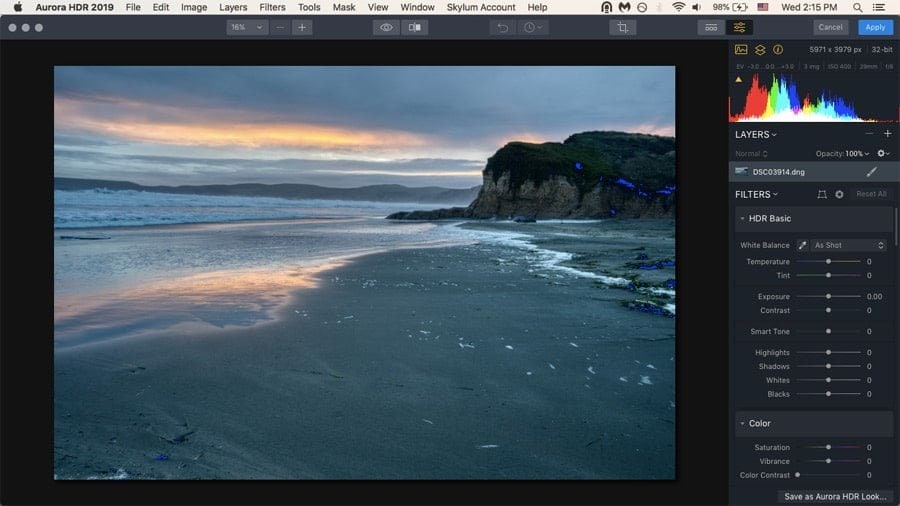
The first thing that both novices and experienced photo editors who work in Lightroom will notice is that the interface seems quite similar to Lightroom, though much sleeker.
The adjustment panels run down the left-hand side and many of the initial sliders are exactly as you’d see them in Lightroom. There’s even a histogram at the top (which I find very useful).
That’s where the similarities end. Unlike Lightroom, Aurora HDR also allows you to work with layers, masks and blending modes à la Photoshop.
If you’re a beginner, this probably won’t make much difference to you, but if you’re used to having serious control over exactly how you adjust your images, this will be a serious plus.
Like some aspects of Lightroom, all of the changes you make to an image in Aurora are non-destructive. The program saves to its own file format where it preserves all of your editing history and adjustments. You can go back any time and tweak things.
Of course, you can also export as a .jpeg or .tiff, but then you get the image only – no editing history.
One aspect that Aurora HDR 2019 has that both Photoshop and Lightroom don’t have, is intuitive ease of use. There’s very little learning curve.
Whether you’re someone who’s never shot in HDR or you’ve been doing it for years, the UI is sleek and easy. Everything is laid out in front of you and it only takes a little experimentation to figure out your work flow.
You can even use other Photoshop plugins with Aurora. So if you already have an established workflow with say, Nik and Topaz filters, you can use them directly through Aurora.
(Honestly, I haven’t found any filter that really comes close to what the Tonal Contrast in Nik’s Color Efex can do. It works amazingly well with HDR, too.)
The last thing that I just absolutely love about both Aurora and Luminar, is that each filter has a simple, obvious on/off toggle button. I can easily see what the changes will do to the image without having to turn off an entire layer.
While this isn’t necessarily unique, it’s definitely one of the things I use the most.
[Related: Luminar Discount Code]
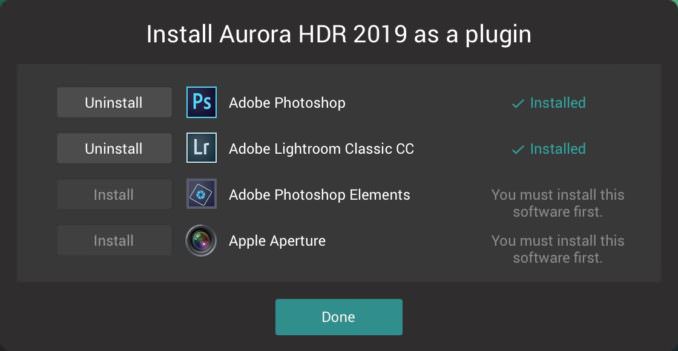
Installing Aurora HDR 2019 as a plugin is simple
What your workflow will look like will depend on whether you intend to use Aurora as a standalone software or as a plugin.
If you’re not already used to Photoshop and Lightroom (or you stopped using them when they changed over to subscriptions), Aurora HDR will probably work fine as a standalone.
It allows you to crop, transform, manually correct for lens distortions, and use any other Photoshop plugins in tandem with it.
It also has a curves adjustment panel, HSL, split toning, and vignette, as well as excellent noise control.
If you’re used to Adobe products however, you’ll probably appreciate it more as a plugin.
Manually adjusting for lens corrections is challenging for most people, there’s no healing brush, and I don’t always want to have to manually paint my selections in (an issue I have with Luminar as well).
Also, if you’re already using Lightroom’s catalog system, then it will make more sense to stay with that.
Aurora HDR 2019 Review | Features and Filters
Just like with Lightroom, you can use the histogram in Aurora HDR to reveal areas of clipped highlights and shadows.
As far as the different filters and features are concerned, don’t be fooled by the simplicity of the interface – they’re quite powerful and in some cases, very unique.
Many use artificial intelligence (e.g. Smart Tone, HDR Clarity, and HDR Smart Structure) and some are downright novel (e.g. Dodge and Burn, Adjustable Gradient, and LUT mapping). Skylum’s sister program, Luminar, also has these.
All the Powerful Tools & Features of Aurora HDR 2019
- Advanced tone-mapping technology
- Advanced image processing engine
- Mac & Windows Support
- Intuitive user interface
- HDR Enhancer
- Fast Brackets Merging
- Native RAW Support
- Pro Preset Packs
- Custom preset pack support
- History Panel
- Histogram
- Before & after comparison
- Lens Correction tool
- Transform Tool
- Dodge & Burn Filter
- Image Flip & Rotate
- Multiply layers & blend modes
- Color Temperature
- Image Radiance
- Masking
- Crop tool
- Detail, clarity and structure controls
- Polarize Filter
- Feather & Density for layer masks
- Top & Bottom Adjustment
- Gradient Masking tool
- Dozens of smart color controls
- High-quality presets for all HDR styles
- Luminosity Masking
- Smart Tone
- Whites & Blacks
- Highlights / Midtones / Shadows
- Touch Bar Support (Mac)
- Custom textures
- HDR Denoise
- Glow tool
- Tone curve tool
- Vignette
- HSL Panel
- Color Toning panel
- Batch Processing
- Auto Alignment
- Automatic Deghosting
- Chromatic aberrations reduction
- Social sharing (FB, 500px, Twitter, etc)
- Adobe Photoshop plug-in
- Adobe Lightroom plug-in
- Apple Photos/ Aperture extension
- Multiple license for 5 computers
- +over 100 tools and features
On this most recent version of Aurora HDR 2019, the sliders are incredibly sensitive.
Since I’m looking for a natural-looking image, I rarely need to make any adjustments far beyond 10-20, especially when working with filters like HDR Clarity, Smart Structure, and so on.
For me they’re like salt: little really improves the image; too much and it can become, well, inedible.
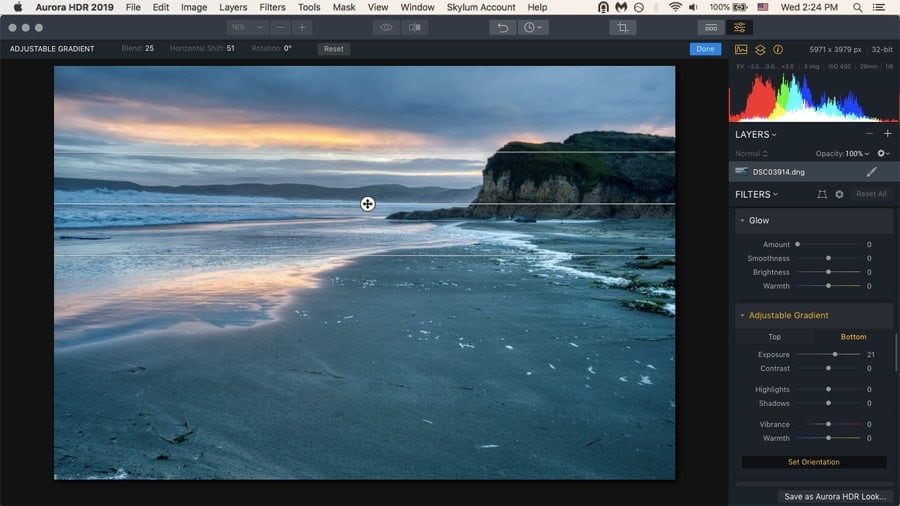
The adjustable gradient filter in Aurora HDR is especially useful for working on landscapes. It allows you to set the orientation and then adjust the top of the image separately from the bottom.
Of the more unique filters, one of the more useful ones for me in my landscape work is the Adjustable Gradient. (Luminar has this as well.) It allows you to adjust the top of the image separately from the bottom.
In landscapes, the sky is often much brighter than the foreground – even when using HDR. Being able to quickly and easily change the sky without affecting the foreground (and vice versa) saves me loads of time.
There’s no need to create another layer and a layer mask. Simply set the orientation and adjust. This feature is especially useful when editing photos of sunsets.
Other more proprietary filters that make a huge difference in my images’ final look include the color contrast slider, the HDR Enhance panel, and the Image Radiance filter. All of these, used judiciously, can really enhance an image.
And remember the race car analogy I used above? The AI filters (Smart Tone, HDR Clarity, and Smart Structure) are particularly powerful, with only the slightest of adjustments making powerful changes.
You don’t need to yank the wheel – just a slight nudge is often all an image needs, at least when doing realistic photography.
Aurora HDR 2019 Review | Presets and LUTs
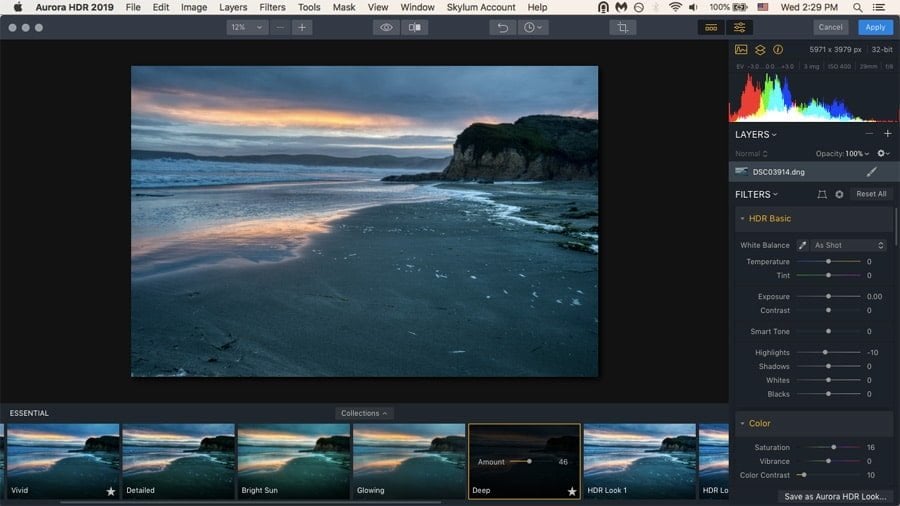
Like most other HDR editing programs, Aurora HDR 2019 comes with a number of presets that they’ve now renamed as “looks”.
They’re incredibly easy to adjust, both in terms of the single slider each preset has and via the adjustment panels on the left. Just about all of these pack quite a punch, though, so you’ll probably want to dial them back significantly.
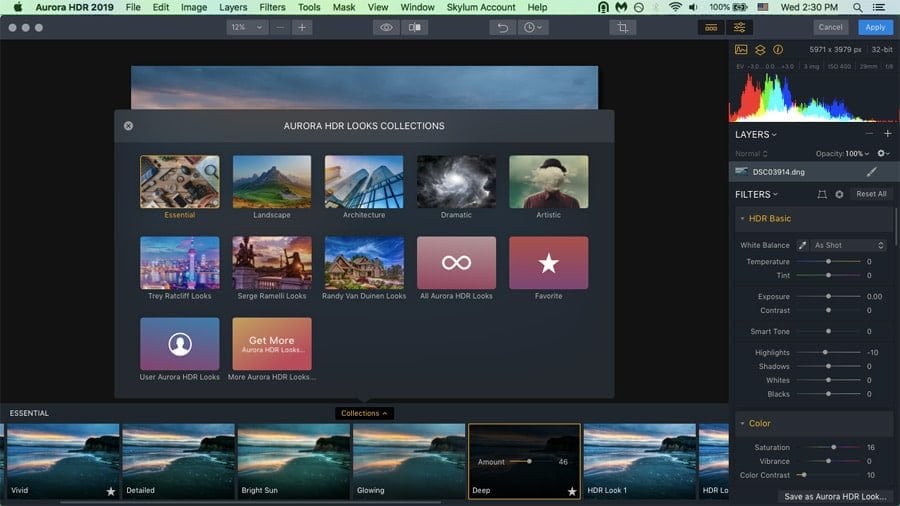
While the preset collection that comes with 2019 is a bit slim, there are more Looks available on Skylum’s site and you can easily create and share your own as well.
Along the same lines, both Aurora HDR and Luminar come with the ability to use LUTs. Look Up Tables are usually used in movie making, but can offer some great looks to still images too.
Aurora HDR 2019 comes with a number of LUTs that you can use just like presets, or you can use other LUTs that you might come across elsewhere.
I may be wrong, but I’m pretty sure no other strictly HDR software has this available.
Also, while you are able to load LUTs into Photoshop, it’s much easier to do it with Aurora HDR.
Taking advantage of LUTs and presets in Aurora HDR is a piece of cake.
For me personally, though, I don’t find the presets or LUTs all that useful in Aurora. I’m more likely to get the look I’m going for simply going down the left-hand column and adjusting the sliders.
Mostly I just use the presets for inspiration when I can’t quite get an image looking as good as I’d like it to. Or for when I’m looking for something different, but I don’t know exactly what it is.
As I rarely find a preset I want to use, I’m grateful for the history pull-down menu that makes it super easy to go back however many steps I need to.
I do occasionally use the LUTs and presets in Luminar, though. But they come at the end of my workflow, not at the beginning when I’m using Aurora. They have some particularly nice ones that are downloaded from the Skylum site.
Aurora HDR 2019 Review | What Could be Improved
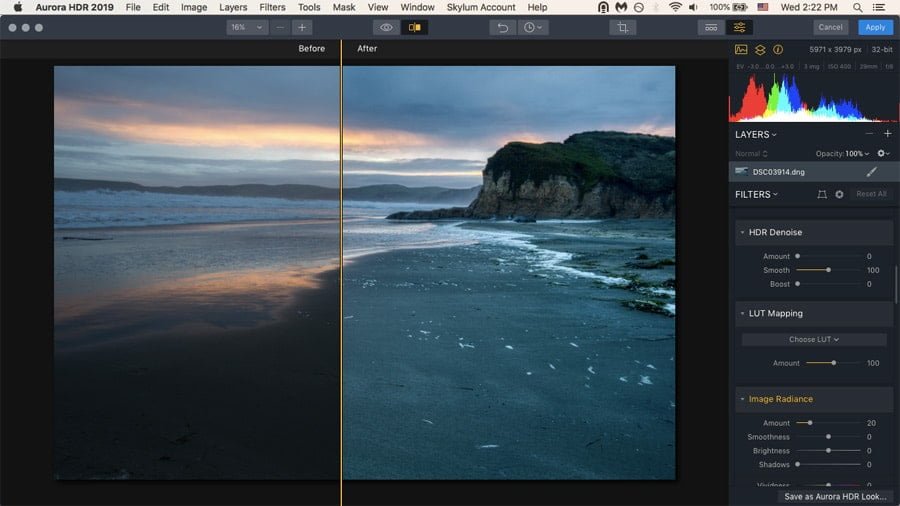
The Aurora before and after slider seems a little redundant to me.
One thing I find particularly useless (although it looks cool) is the before/after slider bar. I may be wrong in this, but the “before” slider image seems to be taken from the middle exposure image before they were combined, not the baseline combination of all three images.
I’d also really appreciate it if both Aurora and Luminar would offer some more advanced selection tools. Not everyone wants to draw their masks in by hand or use a gradient.
In the same vein, offering some kind of healing brush would go a long way towards making this a standalone program. As it is, you need to use it in tandem with another editing program if you need to erase anything (like lens dust or water droplets) from the image.
Also, the presets/looks would be easier to use if they had a simple on/off toggle button like the filters do so we could see their effects without having to change the slider. It’s just a little thing, but would be oh-so-helpful.
Lastly, Aurora HDR 2019 needs a lot of processing power to run. Even on a brand new 2018 iMac it was taking a long time to get the initial image. On my little 2010 Macbook Air, it’s agonizingly slow.
Frequently Asked Questions
What is the best HDR software?
Aurora HDR is certainly one of the best HDR apps on the market – if not the best. It uses an advanced AI-powered engine, has an intuitive interface, and offers a variety of presets and filters that make life easier.
What is Aurora HDR Express?
Aurora HDR Express is a simplified and stripped-down version of Aurora HDR, also developed by the company Skylum. Like Aurora HDR, Aurora HDR Express simplifies the creation of stunning HDR photos – the difference is that a number of features are missing from the Express version.
Does Lightroom do HDR?
Yes, you can process HDR photos from directly within Lightroom. However, the functionality is more limited than with a dedicated app like Aurora HDR.
How do I add Aurora HDR to Lightroom?
Open up Aurora HDR and in the main menu click on Install Plugins. From there you can select which software you want to use Aurora with. Currently it can be used as a plugin with Lightroom, Photoshop, Photoshop Elements and Apple Aperture.
Is Aurora HDR worth it?
Although a bit pricey at $99, Aurora HDR provides an excellent workflow for HDR enthusiasts, and it’s one of the best HDR programs in the market. It offers a wide array of tools, allowing users to edit, optimize, and enhance photos perfectly.
What is the latest version of Aurora HDR?
The latest version of Skylum’s HDR software is Aurora HDR 2019, which was released in October 2019.
Aurora HDR 2019 Review | Final Thoughts
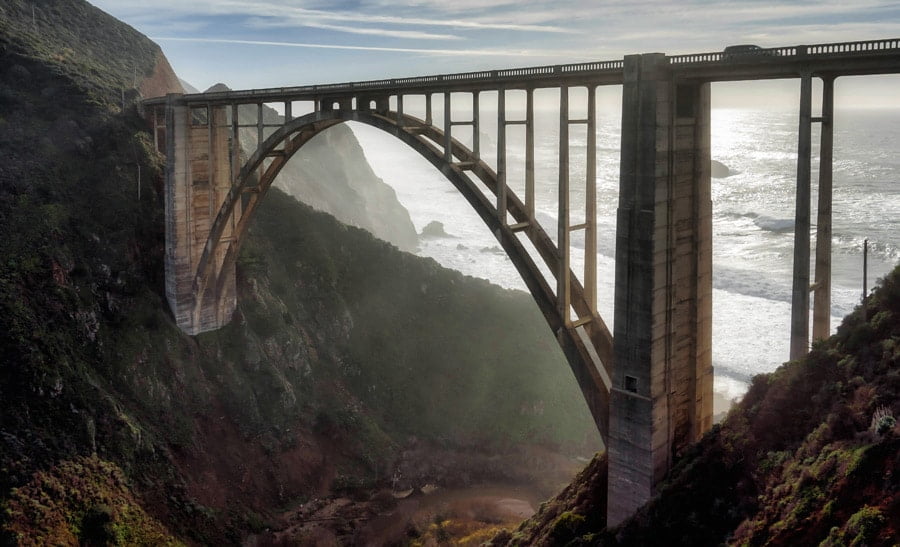
Bixby Bridge 3-exposure HDR shot merged and edited using Aurora HDR 2019 | 1/200 f/8 ISO 100 | Sony a7III + Sony FE 16-35mm f/4 ZA
The new Quantum HDR Engine really does make a huge difference in the quality of the initial image imported into Aurora HDR 2019 (whether bracketed or tone-mapped).
In fact, I was honestly able to rescue a number of older images that just didn’t come out well in Nik’s HDR Efex Pro 2 or even in the 2018 version of Aurora HDR.
No other HDR editing program offers layers, the ability to use Lightroom or Photoshop plugins, and a super-intuitive user interface all packaged into one.
Added to this, Aurora HDR 2019 makes the most realistic photos I’ve ever seen in an HDR program – don’t be put off by its outdated name – this software is still the best option available here in 2024.
It’s supremely easy to use and works well as a plug-in for Photoshop and Lightroom. You really can’t go wrong with this amazing piece of software.
If you can recommend a better HDR program, I’d love to hear about it… but it’s hard to imagine anything beating Aurora HDR 2019 any time soon.
Luminar Neo HDR Merge provides all the capabilities of Aurora 2019 plus additional powerful editing features to take your images to the next level.
Use code shotkit10neo to save $10 at checkout.
Teryani Riggs (they/them) is an adventure, who loves all things wild and free. Teryani can often be found in the midst of a social/eco-justice campaign, hiking through wild backcountry, or hitchhiking around the world listening to other people’s stories. While their focus has historically centered on landscape, travel, and wilderness photography, they’ve also been hired to shoot genres as varied as historical fiction reenactments in the studio to product and food photography.
17 Comments
Leave a Comment
👋 WELCOME TO SHOTKIT!
🔥 Popular NOW:

I have had the Aurora program for some years now and my computer had to be fixed and lost everything on it. Don’t have the activation key and would love it if you could send to my email at patty692@yahoo.com. I should be in your files when I purchased it. Thank you
Patty Brown
Hi Patty I would contact Skylumm support directly.
Is there a trial version of aurora HDR?
I bought Luminar AI thinking that would be all I need to edit my photos, I shoot raw/jpeg on my Sony SLT A65. What if any benefit would I get from using aurora hdr? Does it act as a plug-in for lminarAI?
Aurora is just for HDR, John – it’s a separate software by the same company. Unless you shoot HDR images, it’s not necessary.
This is really, really bad. I just bought Aurora only to find out no CR3 support once I tried to do an import. WTF? Skylum needs to let prospective customers know this limitation, or archive the software if they’re no longer supporting it.
I agree that’s annoying, Charl. I trust you got your money back, though?
I have the same problem. No CR3 supported. I was told to convert the RAW files into DNG files. This appeared to work for a few weeks. Now it doesn’t. Aurora just shuts down when I try to run the program with DNG files. Impossible. I have no time for this.
My burning question is: does Aurora do bulk HDR processing like Photomatix? i.e a batch of, say 30 x 5 exposure sets?
I haven’t done it Keith, but a quick Google seems to show it is possible.
Yes you can, the option is there as soon as you open Aurora.
It is worth noting that there is no support for newer RAW formats like CR3.
I spent about 40 years taking photos, before testing HDR for the first time last summer.
I was a bit tired of Photoshop, so I did a little shopping and got:
Skylum Luminar
Affinity Photo
Aurora HDR
After playing with all 3 extensively, I dropped Luminar (one click sky replacement – WTF, what is next one click pic replacement? My wife -> one click -> Ratajkowski?), and kept Affinity and Aurora.
I love Aurora for the following reasons:
– when used properly it can give you shots with a certain punch, not easily identifiable as HDR
– ghost removal (moving objects) is really excellent and even allows which pic in the stack should win
– alignment of stacks works very well, no need to use a tripod all the time
– works perfectly also with single RAWs
– sometimes using a camera-created JPEG leads to even better results, so don’t think you can feed only RAWS into Aurora. I learned that Nikon is better in RAW->JPG conversion than me+any photo editor (99.99% of times at least), so I shoot RAW only but then use Capture NX-D for batch conversion to JPG
– you can open Aurora and pass a single file (e.g. from Faststone) as parameter – nice and easy workflow
– when compared to Luminar, UI seems more intuitive, l feel better in control
– I don’t know how its done, but Aurora creates looks (good looking ones) I cannot manually replicate in Photoshop. This problem is most likely caused by my limited skillset.
What is missing/ugly:
– clone or healing brush for dust removal (this really, really sucks)
– you can open it and pass a set of files (e.g. from Faststone) as parameter – won’t work, just the first one is opened
– when exporting a result and you close the program too early, export is canceled
– doesn’t work with skin tones: if you dare to open any portrait, the result is always suitable to scare monsters away, but hey who uses HDR with portraits?
– when cropping it always starts with free ratio and each time I have to tell it please: ORIGINAL ratio
TIP:
– after using presets it is a good idea to add an adjustment layer and then to reduce the saturation (I hate that greener that green HDR)/exposure. Without adding the adjustment layer, using the sliders like saturation do not lead to expected results.
Aurora Conclusion: Apart from some minor complaints:
– great pictures with minimum effort
– no need for HDR stacks, works also great on single pics RAW and JPG as well
– speed acceptable (on a high end PC)
Highly recommended from my side!
Wow, Hans! I’ll get you to write the review next time! :p Thanks for the amazing feedback.
Apart from merging bracketed images, how does Aurora improve on Luminar4? I just bought Luminar thinking it would handle all this, then I find you suggest I get Aurora to do the job properly.
Most of the major image editing apps have an HDR editing feature in them, Heather – this one is just designed from the ground up to do that one task, so the results are better, and there are more settings you can fine tune to your liking.
Great program but be aware of you are a canon user it does not yet support cr3 raw files and Skylum will not give any indication when this will be added.
I am a newcomer to Aurora, and this review is enormously helpful; thanks so much for sharing this.